
How to upload ballots as Excel files
Import your ballot papers!
- Save time when creating ballot papers
- Simply upload the ballot papers as an Excel file
- You can even import multiple Excel worksheets
With the POLYAS Online Voting Manager you do not necessarily have to set up your ballot papers manually. You can also create your ballot papers in Excel, either individually or in multiple worksheets and upload them by drag and drop. Read more about how to import ballot papers into our Online Voting Manager!
1. Download Excel template
First, download the current Excel template for your ballot paper. To do this, click the “Ballot paper” tab and then on the “Import and Export” sub-item. You will find the template in the blue box below the title of the ballot paper. This file contains example entries for different election types that you can use as a guide.
Start the Online Voting Manager >

2. Create ballot papers
You can create each ballot paper for your vote on a separate worksheet in the Excel file. In the Excel table, enter all of the voting rules and other information for the ballot paper, using the identifiers indicated by a # symbol as a help. You can even enter the candidates into the Excel file. Please observe the following general tips:
- Set all of the column headings (e.g. candidate first and last names).
- Give each sheet its own name so that the Online Voting Manager can differentiate between them (e.g. candidate 1, candidate 2, vote, etc.).
- When entering data, please use the #identifiers suggested by us (e.g. #ballot paper, #candidates, etc. -> see template).
Note: The order of the spreadsheets in Excel defines the order of the ballots in the Online Voting Manager. After the import you still have the possibility to change the sequence of the ballot papers.

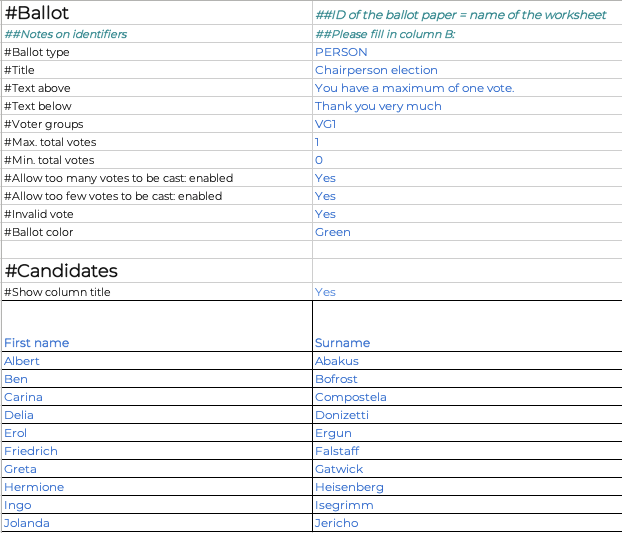
3. Meaning of the identifiers within the template
In the following we explain the meaning of the template identifiers. These identifiers are mandatory, your import will fail if there are empty:
- #Ballot type: To the right of this identifier, specify one of the following types of ballot paper:
- If you are conducting a candidate election or poll, please use the ballot type “PERSON”.
- If you are conducting a closed list election, use the ballot type “LIST”
- To use a different type of ballot paper, for example to carry out a preference vote or an open list election, use the ballot type “OWN”
- #Ballot: This identifies this worksheet to the systems as a ballot paper; please enter this at the top of every worksheet. All subsequent identifiers must be entered below the #Ballot identifier.
Optional identifiers:
- #Title: Enter the title of the ballot paper into the next field on this line
- #Text above: Enter an information text for your eligible voters, which will appear above the ballot paper.
- #Text below: Enter an information text for your eligible voters, which will appear below the ballot paper.
- #Min. total votes: Enter the minimum number of votes that a voter must cast on the ballot. Default value: If nothing is entered into this field, the system takes the default value 0. If a value of 0 is entered or this is the default, blank ballot papers are considered valid. If a value greater than 0 is set, blank ballot papers are considered invalid.
- #Max. total votes: Enter the maximum number of votes that a voter may cast on the ballot. Default value: If nothing is entered into this field, the system takes the default value 1.
- #Exclusive lists: You can use this identifier in a closed list election to specify whether voters can only select one list on the ballot paper or whether they can distribute their votes across several lists on the ballot paper. “Yes” if votes should be assigned exclusively to one list or “No” if it should be possible to distribute votes to several lists
- #Invalid vote: This option specifies whether the voter is shown a checkbox that enables them to explicitly mark their ballot as invalid. “Yes” if the checkbox should be displayed or “No” if the checkbox should not be displayed.
- #Abstention: Specify whether the ballot should contain a separate checkbox that allows voters to abstain from voting. “Yes” if the checkbox should be displayed or “No” if the checkbox should not be displayed.
- #Allow too many votes to be cast: enabled: This option specifies whether or not the electorate or eligible voters should be able to cast a ballot containing too many votes. “Yes”, it is possible to cast ballots with too many votes or “No”, it is not possible to cast ballots with too many votes .
- #Allow too few votes to be cast: enabled: This option specifies whether or not the electorate or eligible voters should be able to cast a ballot containing too few votes. “Yes”, it is possible to cast ballots with too few votes or “No”, it is not possible to cast ballots with too few votes.
- #Voter groups: Here you can indicate the groups of voters who can see and fill out this ballot paper during the poll.
- #Free-text input fields: This identifier can only be used if the feature “Free text field” is enabled. The identifier must be in the candidate block. You can use it to determine the number of free-text input fields on the ballot paper.
- #Min. votes free-input text field: This identifier can only be used if the feature “Free text field” is enabled. Enter here the minimum number of votes that can be cast per free-text input field.
- #Max. votes free-input text field: This identifier can only be used if the feature “Free text field” is enabled. Enter here the maximum number of votes that can be cast per free-text input field.
- #List Title: If you are conducting a closed list election or you wish to specify a full list of candidates, you can enter the name of the electoral list here.
- #Show list name: Here you choose whether the list name should be displayed on the ballot. “Yes” if the list name should be displayed or “No” if the list name should not be displayed.
- #Show column title: Use this line to decide whether to display the column headers of the candidate table or electoral list. “Yes” if the column header should be displayed or “No” if the column header should not be displayed
- #List ID: You can enter an abbreviation for the electoral list here. This is not displayed to the electorate or eligible voters.
- #Max. Votes for List: Enter here the maximum number of votes that an eligible voter may cast per list. The votes per list are those votes that an eligible voter can cast for the entire electoral list (= in the list header). Default value: If nothing is entered into this field, the system takes the default value 1.
- #Min. Votes for List: Enter here the minimum number of votes a voter must cast for a list. The votes for a list are those votes that a voter can cast for the entire electoral list. If you leave this field empty, the system assumes the default value 0.
- #Max. votes within the list: Enter the maximum number of votes a voter can cast per list. The number of votes per list is the sum of the number of votes a voter can give to each listed candidate and the number of votes he or she can cast on the list as a whole. If you leave this field empty, the system assumes the default value 1.
- #Min. Votes within the list: Enter here the minimum number of votes a voter must cast per list. The number of votes per list is the sum of the number of votes a voter can give to each listed candidate and the number of votes he or she can cast on the list as a whole. If you leave this field empty, the system assumes the default value 0.
- #Max. Votes per Candidate: Enter the maximum number of votes a voter can give per candidate / voting option / per line of the ballot paper. If you leave this field empty, the system assumes the default value 1
- #Min. Votes per Candidate: Enter the minimum number of votes a voter can give per candidate / voting option / per line of the ballot paper. If you leave this field empty, the system assumes the default value 0.
- #Ignore worksheet: Enter this identifier if you do not wish to import a worksheet into the Online Voting Manager.
- ##: Enter two hash characters at the beginning of a line in the worksheet if this line should not be imported into the Online Voting Manager.
4. Upload ballots
You can now drag and drop your completed ballot paper into the window, so uploading it to the Online Voting Manager. The uploaded ballots are then displayed with further information in a table. If you made a mistake on your Excel ballot paper, the corresponding ballot paper will be marked in red. To see how you can fix the error, click “Download error” in the lower left-hand corner. You will now receive an Excel file with the faulty cells marked and a message indicating what the error is. Once you have corrected the errors, upload your ballot paper again. Finally, click on “Save”. The ballot papers are now displayed in your overview on the left-hand side of the screen.